
When you decide to try your hand at pressure washing, you will do everything wrong. You will charge too much because your method takes three times longer than necessary. You will buy a dinky pressure washer from Home Depot with a lawn mower engine that is nowhere near powerful enough and burn out after the tenth job. You will climb ladders with a wand and hoses in tow and blast the siding point-blank. There is a good chance you will hurt yourself and damage the structure you are cleaning.
I attended an IWCA Convention in Atlanta one year, and they offered an introductory course in pressure washing. It was a real eye-opener. The instructor only had an hour to lecture, and he admitted that he had only scratched the surface. But it was enough to point me in the right direction. A seminar lasting several days would have been more useful and logical.
The pressure washing equipment is expensive, requires frequent maintenance, and takes up a lot of storage space. The real pros use trailers with all kinds of hose reels, buffer tanks, and sometimes burners to heat the water. But since this article is aimed at window cleaners looking to add a sideline, we will go over the equipment needed to get started doing houses. After the third little engine blew up in the middle of a large job, I finally broke down and got a proper pressure washer. It has a Honda GX 390 with 4000 psi. I never could get the injector to work properly, so I got an Xjet that attaches to the end of my wand. It has the disadvantage of carrying a bucket of solution around with you as you apply it to the house. But it does keep the solution out of the hoses and the machine, reducing corrosion. This is called downstreaming. A garden hose will be needed to attach to the structure to access water to the machine. Pressure washing hoses go from the machine to the wand. You will need a gas can to fill up the tank. Wear gloves, eye protection, and a breathing apparatus to prevent injuries. Put sun tan lotion on exposed areas, or you will burn. After you’ve completed the job, do not drink carbonated beverages, some solution will be absorbed through the skin and react in your stomach and you will get bubbly guts.
The chemicals you use to do the job are as important as the equipment. They actually do the work. I bought gallon bottles of Vertex Pool Shock (sodium hydrochlorite) from the local pool supply center, put it in my 5-gallon solution bucket (2 gallons), mixed it with water (3 gallons), and a few ounces of soap, usually car wash soap such as Simple Cherry. If you are trying to whiten gutters, a special chemical such as Gutter Zap or Gutter Grenade may be required. A pole with a siding brush will be useful.
After setting up your equipment and applying the solution, make sure you water down the plants and vegetation to prevent them from being killed. Apply the solution to the siding and gutters and then sit for 5 minutes. Then rinse. Soak the vegetation again to make sure the plant life survives.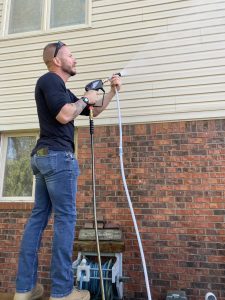
Don’t think for a minute this article is a comprehensive, all-inclusive guide to start pressure washing. I’m sure the experienced pressure washers reading this are saying to themselves that I left out a lot of stuff. If you are serious about getting into this, take a course given by experts. Get on YouTube and watch some instructive videos to get an idea of what all is involved.
You know that feeling of pride and satisfaction you get from making a wall of dirty glass all shiny and perfect? Pressure washing gives you that feeling after doing a moldy, dingy house. Sometimes it comes out looking brand new. And pressure washing creates work for us window cleaners; the windows get spotty. If you add pressure washing as a sideline, ensure you are prepared.
Recent Comments